Bags, babies, beauty, and whatever else crosses my mind...
Showing posts with label DIY. Show all posts

Monday, June 24, 2013

New Dress Up Storage & Organization!

Tah dah! Everyone at our house is now a princess... due to our wonderful new dress up organization for the girls' dresses and accessories! It works as great storage when the items are not in use and gives them easy access to use things during play time!


We had originally seen a dress up station on Wayfair.com, but my husband thought it was something he could tackle and do himself. We came across blogger Jess, that had that same thought on "Craftiness is not Optional", which even contained a link to another site by Ana White that had some plans for similar designs! He went to work on ours and came up with a design that would work great in our play room.

My husband put it together over a few weekends, with some additional work time being added on it by using a router on all of the edges to give them a rounded finish - so there were no sharp corners in the girls' play area. We picked out paint at Lowe's (Valspar "Plum Burst" 4002- 10B, in case you're looking for it!) - and made our own stencils on some card stock using a font in the word processing program on our computer. I think it turned out beautifully!


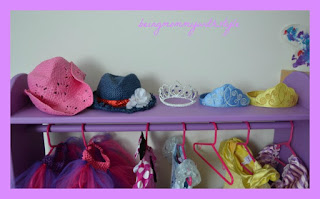
The top shelf has storage space for tiaras, cowboy hats, and the pirate hat... if it was ever not in use!


Lots of room to hold the ever important dresses & tutus!


The bottom has a bin that is a great little cubby for purses, shoes, and jewelry:


It has been a great addition to the play room! I will do an updated playroom organization video soon!

Here's the reveal of the dress up station to the girls for the first time - and a mini tour of their dress up items (so far, ha!) in their collection:


The girls loved it, as you can see here!

Cupcake looking all grown up in her Rapunzel costume!


Peanut enjoying the dress up selections!


Great job to Daddy and Grandad - and a very special thanks to Craftiness is Not Optional who was a great help in giving us inspiration for ours, and the plans by Ana White that she linked on her page that gave Daddy a great place to start for ours!

Monday, April 9, 2012

How to make adorable korker hair bows for your Baby or Toddler!

Korker bows are fun and easy to make at home, to match special outfits or for holidays! They are a great way to make a unique bow for your bow collection... one that is made by you for baby!

We have a variety of bows in our collection, some store bought, some bought from sellers on Etsy, and I really appreciate that every bow is different. A lot of thought and effort goes into the making of hair bows by individual sellers we've gotten some of our favorite bows from. I also occasionally like to make our own bows at home though, because I think it is a neat way to have something your child's wardrobe that is made by you. They are easy to make... even if you're not especially crafty! (If I can make korker bows, ANYONE can make them... trust me.)

Check out my You Tube tutorial, and step by step instructions are below!


How to make a korker bow for babies or toddlers!

1) Collect your supplies:
             - 3-4 ribbons in 3/8" length, 1-2 ribbons in 5/8" or 7/8" length, Scissors, Glue Gun, Baking Sheet, Alligator Clips, Crafting Wire, Dowel Rods, and Clothes Pins


2) Preheat your oven to 250 degrees.

3) Wrap a 3/8" ribbon around a dowel rod that is the next size down from your ribbon (so 1/4" dowel for 3/8" ribbon) and use the clothes pin to hold the ends.

4) After you've wrapped 8-10 dowel rods, fill a baking sheet with the dowel rods and place in the oven for 10-15 minutes.

5) After you let the dowel rods cool, remove the ribbon from the rods.

6) Cut into desired lengths.

7) Connect the cut pieces with a small piece of crafting wire, twist the wire to create a defined center.

8) Wrap a small piece of coordinating ribbon around the center of the bow to cover the wire.

9) Glue the bow to a alligator clip that is covered with a bit of coordinating ribbon.

10) Let the glue dry, and don't forget to finish the edges of your cut ribbon! You can use liquid stitch or a heat source to gently melt the edges so that they don't fray with use.

And then you have your finished bows!


As seen as a part of these fun DIY blog parties, come join the fun and get other great DIY ideas! Skip to My Lou, Sarahndipities, & Making the World Cuter